I'm giving away a Fibonacci potholder. To be eligible, you must write a comment on the first post or write your own blogpost. The topic is why you like math. Your comment or post must be completed by the end of the last day of the month. I'd love for you to have a chance to win, and I look forward to reading what you like about math.
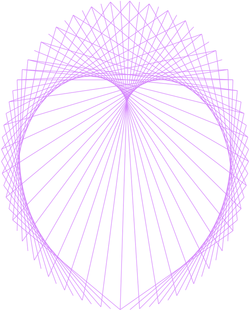
Yesterday, I shared a pattern for drawing a heart with a ruler. I also generated it in Grapher. The result is so lovely that I'm going to print it on cardstock and make a card for a friend who appreciates things homemade. I know the perfect thing to wrap around it: an envelope. Not just any envelope, but a homemade envelope through a design technique called paper sloyd.
I learned about sloyd at the Living Education Retreat in Minnesota last summer. Homeschooling blogger Bobby Jo Nickel taught us how to make lovely picture frames. Back in the day, educators saw paper sloyd as way to prepare primary students for sewing and woodwork. It was the foundation for the manual arts. One Parents' Review article discussed sloyd in great detail, and Charlotte Mason listed it as handwork for children ages 9 to 12 in an appendix of her third book.
Woodworkers still recommend this training to day. I believe the most accessible and least expensive source for it is Paper Sloyd: A Handbook for Primary Grades by Ednah Anne Rich. The first project in this book is an envelope. Today, I sat down with my daughter (an young lady with autism and aphasia) to make envelopes together.
The materials needed are readily available. I picked up some pretty 8.5″ x 11″ stationery and colored copy paper. We find mechanical pencils work for us because they're more precise, but little hands can use whatever pencils suit them best. I prefer transparent rulers because you can see what you are doing more clearly. Stickers add a decorative touch and seal the four corners. I forgot to buy some, so it will have to wait.
We shouldn't pound vocabulary definitions into a child's head and ruin the fun of making envelopes. However, math terms can arise casually. Mason noted that children learn from things, “Set him face to face with a thing, and he is twenty times as quick as you are in knowledge about it; knowledge of things flies to the mind of a child as steel filings to magnet” (page 27). So, I believe that declarative comments like, “How interesting! To make an envelope, we cut a rectangle into a square." And, perhaps, an attentive child might add, "And, we folded it to make triangles!"
Pamela, who is still working on her fine motor skills, enjoyed making an envelope. Since my focus is more on interacting and on fine motor skills, I guided her through the process. Because she is doing high school math, I used mathematical terms in a natural way as I talked about what we were doing. Since she already knows the terms used in the directions (top, middle, bottom, left, and right), I chose more complex words.
For example, after we drew one edge of the square, I said, “I'm going to rotate my paper ninety degrees like this." Later, I said, “We need to draw a diagonal line, so we can know where to fold. I'm going to put my ruler in this vertex here and here." The goal is not for her to memorize the definition of a math term. Rather it is for her to see the context in which the term lives and to know the term through the thing. I didn't force her to repeat each term after me, either. I'm more interested in meaningful communication. She delighted me today because the very first thing she said was, “A letter to who?" followed by “What city?"
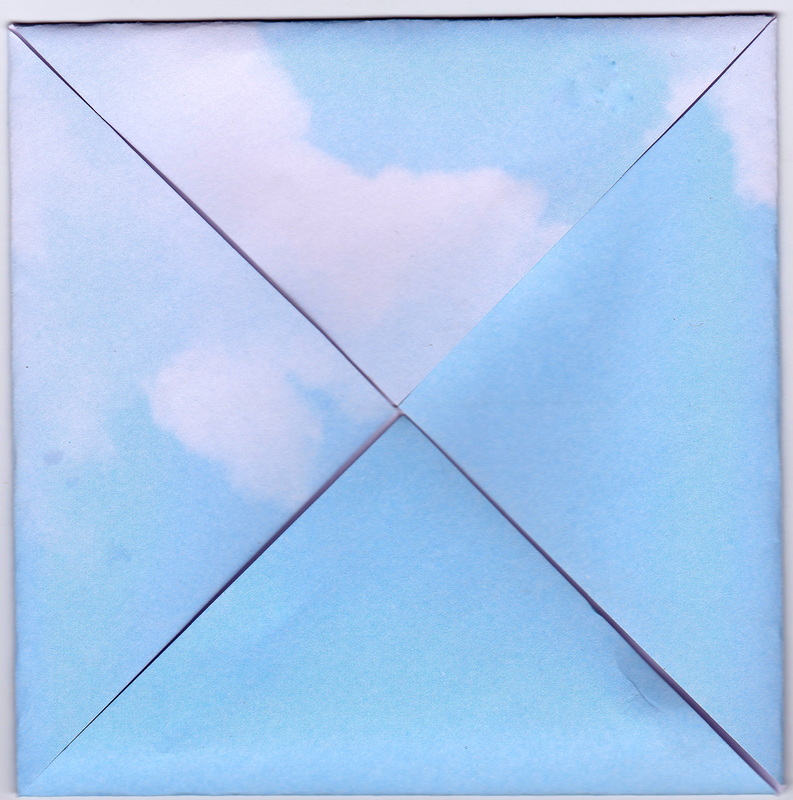
Below are the envelopes. Mine is the cloudy sky while Pamela chose the bright orange. You can see that hers didn't line up neatly because she didn't draw her points precisely. We both enjoyed working together and that is what matters most. She made the decision to write her initials, city, state abbreviation, and zip code.
I learned about sloyd at the Living Education Retreat in Minnesota last summer. Homeschooling blogger Bobby Jo Nickel taught us how to make lovely picture frames. Back in the day, educators saw paper sloyd as way to prepare primary students for sewing and woodwork. It was the foundation for the manual arts. One Parents' Review article discussed sloyd in great detail, and Charlotte Mason listed it as handwork for children ages 9 to 12 in an appendix of her third book.
Woodworkers still recommend this training to day. I believe the most accessible and least expensive source for it is Paper Sloyd: A Handbook for Primary Grades by Ednah Anne Rich. The first project in this book is an envelope. Today, I sat down with my daughter (an young lady with autism and aphasia) to make envelopes together.
The materials needed are readily available. I picked up some pretty 8.5″ x 11″ stationery and colored copy paper. We find mechanical pencils work for us because they're more precise, but little hands can use whatever pencils suit them best. I prefer transparent rulers because you can see what you are doing more clearly. Stickers add a decorative touch and seal the four corners. I forgot to buy some, so it will have to wait.
We shouldn't pound vocabulary definitions into a child's head and ruin the fun of making envelopes. However, math terms can arise casually. Mason noted that children learn from things, “Set him face to face with a thing, and he is twenty times as quick as you are in knowledge about it; knowledge of things flies to the mind of a child as steel filings to magnet” (page 27). So, I believe that declarative comments like, “How interesting! To make an envelope, we cut a rectangle into a square." And, perhaps, an attentive child might add, "And, we folded it to make triangles!"
Pamela, who is still working on her fine motor skills, enjoyed making an envelope. Since my focus is more on interacting and on fine motor skills, I guided her through the process. Because she is doing high school math, I used mathematical terms in a natural way as I talked about what we were doing. Since she already knows the terms used in the directions (top, middle, bottom, left, and right), I chose more complex words.
For example, after we drew one edge of the square, I said, “I'm going to rotate my paper ninety degrees like this." Later, I said, “We need to draw a diagonal line, so we can know where to fold. I'm going to put my ruler in this vertex here and here." The goal is not for her to memorize the definition of a math term. Rather it is for her to see the context in which the term lives and to know the term through the thing. I didn't force her to repeat each term after me, either. I'm more interested in meaningful communication. She delighted me today because the very first thing she said was, “A letter to who?" followed by “What city?"
Below are the envelopes. Mine is the cloudy sky while Pamela chose the bright orange. You can see that hers didn't line up neatly because she didn't draw her points precisely. We both enjoyed working together and that is what matters most. She made the decision to write her initials, city, state abbreviation, and zip code.
 |  |
One family shared their first attempt at sloyd. I'm looking forward to seeing yours!
 RSS Feed