Pamela and I made the third model in Edna Rich's handbook on paper sloyd today. I like how the book takes the theme of drawing a 6″ by 6″ square and elaborates on it. I've noticed Pamela improve in her handling of a ruler and hole puncher while she needs more practice in her cutting and folding. Her picture frame is on the left. When I made one at the Living Education Retreat last summer, our guide gave us pretty scrapbook pages. I didn't want to waste good paper on a trial run.
I love improving on designs. I don't like how the frame pops up and doesn't lie completely flat. Tying the bows too tight rips the cardstock. I began to wonder what would happen if I curve stitched the frame, instead. Unfortunately, I had already punched holes but this is a trial run after all.
I love improving on designs. I don't like how the frame pops up and doesn't lie completely flat. Tying the bows too tight rips the cardstock. I began to wonder what would happen if I curve stitched the frame, instead. Unfortunately, I had already punched holes but this is a trial run after all.

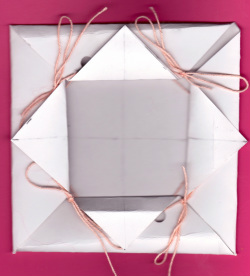
First, I curve stitched a star. I centered a 6″ by 6″ plus sign (+) inside the frame. With a pencil, I made fifteen points, spaced 1/8 inch apart, on the horizontal line and on the vertical line of the symbol. Then, I pricked the points with a needle and sewed the star with filet crochet thread (size 10 cotton).
Then, I made fifteen points in pencil, also spaced 1/8 inch apart, along the top, bottom, left, and right inner edges of the frame. I pricked holes through the flap to the square underneath, which was rather difficult because I had to push the needle through three layers of cardstock. I ended up making the cat's eye pattern I made in my first curve stitching video.
I think the mixing of media turned out well, and I may pick up some pretty scrapbooking pages and glittery thread. Perhaps, curve stitching a heart inside might make a lovely Valentine's Day card.
I'm looking forward to sharing this with the students at school.
 RSS Feed